Only one work string (or drillstring) can be in the hole at one time. The previous work string must be pulled before creating a new work string. To pull a work string, enter a Date/Time Out in the Summary tab area.
Tip: Drillstrings are added in the Daily Operations report and work stings can be added in a number of reports in OpenWells, including the Daily Operations, Casing, Cementing, Coring, Fishing, Logging, Perforation, Sidewall Coring and Stimulations reports. Use the Wellbore Schematic diagram to identify the work string installed down hole.
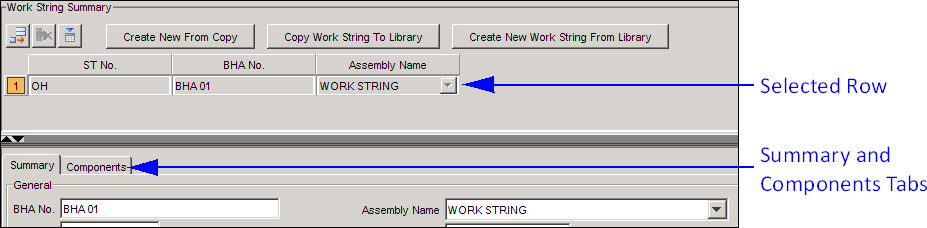
When a row in the spreadsheet is selected, its data is displayed in the Summary and Components tabs below.
To create a new work string
assembly, add a new row to the spreadsheet using the ![]() Add a row button.
Add a row button.
Summary Tab
Enter work string's information in the Summary tab area below the spreadsheet.
MD In and Date/Time In
The MD In and Date/Time In fields define the depth and time at which the string is run "downhole".
The Date/Time In field automatically populates based on the date of the Daily Report date and the Reporting Standard selected for the Company (see Company Properties). For all subsequent rows, the Date/Time In field will be automatically populated with the data entered in the Date/Time Out field in the previous row.
MD Out and Date/Time Out
The MD Out and Date/Time Out define the work string as pulled.
Note: Before a new row can be added any Work String or Drillstring spreadsheets, the Date/Time Out and MD Out fields for the previous row must be entered. If these are not entered, the following message will appear, "The previous drillstring has to be pulled out before you can add a new one."
Left in Well and Create Obstruction Button
Activate the Left in Well checkbox if the BHA was not removed from the well. The Create Obstruction button becomes available. If the work string assembly was dropped or stuck in hole, use this feature to create an obstruction. Click the Create Obstruction button to quickly create an obstruction. The work string will be listed in the Wellbore Obstruction section in the Wellbore Obstructions spreadsheet, with all of its components listed in Obstruction Components spreadsheet.
Create New From Copy Button
The Create New From Copy button is used to copy a work string or BHA already existing in an OpenWells® report and displays the Select Assembly String dialog.
The Select Assembly String dialog contains the following tabs:
Select Existing String to Copy - This tab allows the user to select from a list of existing assembly strings.
Select Planned String to Copy - This tab allows the user to select from a list of "planned" assembly strings.
Select the Well and Wellbore that contain the work string or BHA to be copied. A list of available assembly strings appears in the Select an Assembly String table.
Note: Only two rows of the table can be viewed, use the scroll bar buttons to locate the assembly string to copy.
Select the assembly string to be copied. The Components for Selected Assembly String table displays a detailed list of the components of the selected assembly string.
Click OK to copy the string to the Work String area.
OpenWells creates a new row in the Work String Summary table and populates the Summary and Components tab areas with the information from the copied string.
By default, the new BHA number is called Copy of # (# = copied BHA number). This number can be changed in the BHA No field in the Summary tab, General area.
Copy Work String To Library
The Copy Work String To Library button is used to copy a work string and its components into the Work Strings Library.
To copy a work string to the library:
Click the Copy Work String To Library button. The Save String to Library dialog appears. By default, the Assembly Name is the name of the new string, but the user can change the name for the new work string.
Click Save to save the string to the library.
Create New Work String From Library
The Create New Work String From Library button is used to copy a work string from the Library to quickly populate a new assembly and components.
To populate a new Work String from the library:
Click the Create New Work String From Library button.
In the Select String from Library dialog, select a string from those displayed in the list and click OK.
Components Tab
The Components tab section displays the components that make up the work string assembly. Use the Components tab spreadsheet to describe all components for the entire work string.
For information on using spreadsheets, see the Using Spreadsheets and Tables topic.
To add a component, add a new row to the spreadsheet
using the ![]() Add
a row button. The
Add
a row button. The ![]() Insert a row button can also be
used to insert a row above the selected row.
Insert a row button can also be
used to insert a row above the selected row.
Specify Components Selection
The Specify
![]() Components picklist enables users
to select the preferred method for entering components. For example, to
start at the top most component select and end with the bottom most component
select Top to Bottom.
Components picklist enables users
to select the preferred method for entering components. For example, to
start at the top most component select and end with the bottom most component
select Top to Bottom.
Section Type and Component Type
For each component, select the Section Type and Component Type from the picklists.
Some component Section
Types are supported by EDM™ catalogs. When these component types
are selected, a Catalog Selection
dialog appears enabling the user to select the component. The Auto
Catalog Select command defines if a catalog is automatically opened
when the Section Type is selected. By default, the Auto Catalog Select
option is active. Alternatively, select the ![]() Catalog button for the currently
selected Component row.
Catalog button for the currently
selected Component row.
For information on using a catalog, see the Catalogs topic.
Component Details Button
Click the ![]() Component Details button to add
or modify the details of the currently selected component in the Component's
Details dialog.
Component Details button to add
or modify the details of the currently selected component in the Component's
Details dialog.
File Attachment Support ( ![]() )
)
The Components spreadsheet allows for one or more files to be attached to a row in the spreadsheet.
To attach a file to a row in the spreadsheet,
left-click the cell in the ![]() (Attachment)
row and select New.... The Attachment
Properties dialog appears that allows the user to attach a
document to the cost item. For more information see the Using
Attachments in Spreadsheets topic.
(Attachment)
row and select New.... The Attachment
Properties dialog appears that allows the user to attach a
document to the cost item. For more information see the Using
Attachments in Spreadsheets topic.
MD Top
The MD Top displays the top depth of the component.
MD Base
The MD Base field is calculated by adding the Length of the string component to the MD Top.
Top Set
The Top Set of the component is calculated by adding the lengths of the previous components to the MD Top.