Options Command
Tools > Options...
The Options menu bar command is used to view and configure OpenWells® temporary and log files.
To access the Options dialog box follow the menu path: Tools > Options....
The Options dialog box appears. This dialog contains the following tabs:
The General tab of this dialog box contains the following two areas:
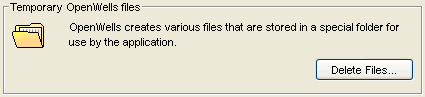
Temporary OpenWells Files:
OpenWells software creates temporary files which are stored in a special folder. The user can delete these files to free up space on the hard drive by clicking the Delete Files button. Before deleting the files a warning message appears, to delete the files click OK, or to cancel the operation click Cancel.
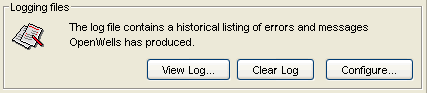
Logging Files:
Errors occurring in OpenWells software are recorded in a Log file, which can be used to diagnose errors that occur in the application.
To view the log click the View Log... button. A text file opens in Notepad. This file can be used by Landmark Support when troubleshooting problems that occur within OpenWells.
To clear the log file click the Clear Log button. This will delete historical errors in the file, but it will not delete the file itself. This can be useful when troubleshooting a particular problem as it will make the file easier to read.
The Configure... button is used to setup various parameters for OpenWells software logging through a configuration file. Speak to your System Administrator or Landmark Support prior to making changes to this file. Changes to this file are not recommended.
Note: The OpenWells.log file is located in the user's Windows profile directory under the Local Settings\Application Data\Landmark\OpenWells folder.
The License tab of this dialog box offers a user license checkout preference mechanism. Use the picklist to select the preferred license feature to be used upon start up. If a Combined license is being used the License Feature currently checked out field will display a license count (the number of licenses currently in use and the total number of licenses available).
OpenWells software must be restarted for license changes to take affect.

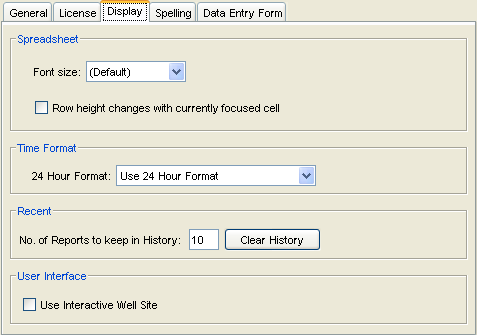
The Display tab allows the user to:
specify a font size for spreadsheets and tables; and allow the row height to change based on the currently selected cell.
define the time format displayed in the application based on Regional Setting or a 24 hour clock
define the number of recently opened reports to be listed under the Well Explorer Recent drop-down list.
define whether the OpenWells application launches to the Classic application (as it normally would) or launches to the Interactive Well Site.
Currently open properties pages or data entry forms must be closed and reopened for changes made in this tab to be implemented.
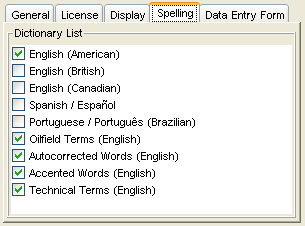
The Spelling tab allows the user to specify Dictionaries used by OpenWells software when running a Spell Check.
Performance
The Data Entry Form tab contains a check box that enables users to improve performance in the Data Entry Form by determining the way in which the Form's Sections are loaded.
When the Load All Sections check box is activated, all sections in the Data Entry Form are loaded when the Form is opened.
When the Load All Sections check box is not activated sections in the Form will load only when they are accessed using the Shortcut Bar or the Scroll Bar.

Style of Data Entry
Users may choose to automatically launch WYSIWYG instead of launching the form view. To do this select the Show 'WYSIWYG' Where Available check box. Once the report is opened in WYSIWYG view, you can switch back to the original view by clicking on the button in the Data Entry Form toolbar.

See What You See is What You Get (WYSIWYG).
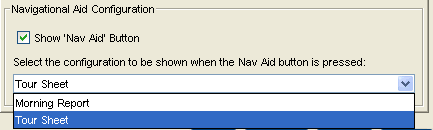
Navigational Aid Configuration
Select the Show 'Nav Aid' Button check box to enable the Navigational Aid in the Data Entry Form window.
Users can configure the Navigational Aid to display using the Morning Report or Tour Sheet configuration. To do this select the desired configuration from the picklist.
See OpenWells Navigational Aid.
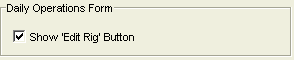
Daily Operations Form
Select the Show 'Edit Rig' Button check box to enable the ![]() button in the Daily Operations form toolbar.
button in the Daily Operations form toolbar.
Related Topics
EDM™ Administration Utility Command