EDM Report Manager
Individual report options are available when you print or preview a report. These options allow you to modify what information displays in the report. In most cases, you will have the option to include or exclude information, while in some cases, a choice is given.
Note: Well Cost software does not include report options, except the option to change the report logo from the Well Explorer's Database node properties dialog.
OpenWells Individual Report Options
Individual report options in OpenWells are accessed two ways:
Automatically if you disable the "Use the options selected last time" check box on the General tab of the "Report Setup" dialog.
From the Report Setup dialog's Report tab
In the OpenWells application, select Tools menu > Report Setup to open the "Report Setup" dialog. If the "Use the options selected last time" check box is enabled, any changes you make to report options when printing/previewing a report are remembered by the program and applied to the next report.
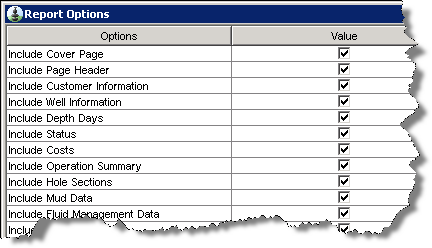
If the option is unchecked, individual report options are available every time you generate a report, as seen in the Drilling Daily Report example below.

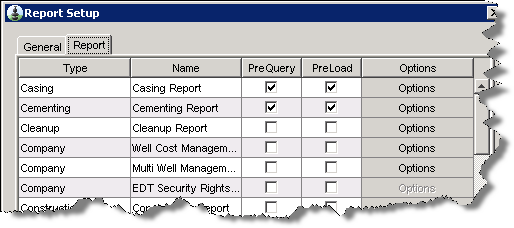
Report Options are also accessed from the Report Setup dialog's Report tab. You can configure how reports are processed and/or options related to report content.
Report Processing Options
Landmark's testing effort revealed that enabled PreQuery and PreLoad options for specific reports can significantly reduce processing times. The specific reports identified by Landmark that benefit most from having the options activated, are set enabled by default.
While PreLoad and PreQuery options improve the report’s performance, they slow down startup of the OpenWells application and consume additional memory. PreLoad consumes memory on the user’s desktop or the CITRIX server, while PreQuery consumes memory on the database server.
Therefore, it is up to you to decide which reports are used on a daily basis and enable the optimization options for these reports.

Report Content Options
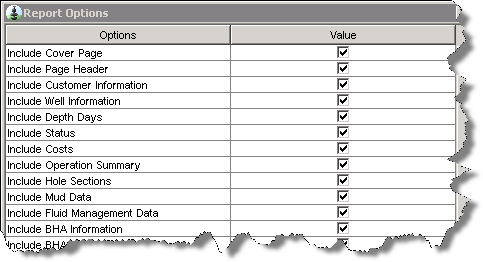
When you click on the "Options" cell associated with the report type, the "Report Options" dialog opens as seen in the example of a Daily Drilling Report below. Here you can activate check boxes to add various options.
Options that are not available will appear grayed out.
Most reports allow you to add a Cover Page and/or Table of Contents. However, some reports have many options, such as the Daily Drilling Report or the Well Planning Report.

COMPASS Individual Report Options
Reports are accessed by opening the Report dialog in COMPASS: software using one of the following methods:
Click on the Reports ( ![]() ) button from the main toolbar
) button from the main toolbar
Right-click on a Design in the Well Explorer, select Reports
From the main screen, Plan Editor, or Wellpath Editor, select Report menu, and then select the report type
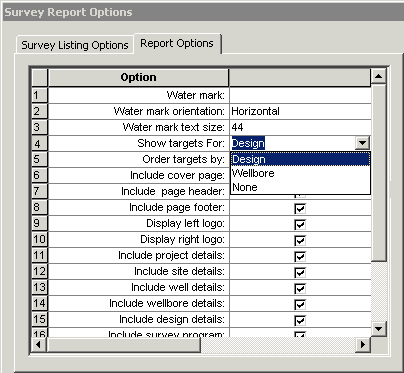
The example below shows how to modify target ordering in a Survey Report.

If you generate a Survey or Planning report, these options display on the Report Options tab as seen in the example above. When you generate an Anti-collision or Summary report, these options display in a dialog.
Water mark
Enter text to be displayed as a watermark. If you do not enter any text, there will not be a water mark on the report.
Water mark text orientation
Click on the cell to display a drop-down list. Select the water mark orientation from the drop-down list.
Water mark text size
Specify the font size you want to use for the water mark.
Show targets for
Click on the cell to display a drop-down list. Select which target you want to include in the target section of the report. Select Design to display the targets assigned to the design. Select Wellbore to display targets assigned to the wellbore. Select None to hide the target section.
Order targets by
Click in the cell to display a drop-down list. Select how you want to order the display of targets in the target section of the report. Select TVD to order targets in ascending true vertical depth. Select Name to order targets in ascending alphabetical order by target name. Select As planned to order targets in the measured depth order they are used by the plan. Targets not used by the plan will appear at the bottom of the listing.
Check boxes
Several check boxes appear in the grid. Check the boxes associated with the information you want to appear on the report.
Related Topics