How do I Create a Well?
Frequently Asked Questions
![]() To view a video demonstrating the creation of a Well in OpenWells® software click here.
To view a video demonstrating the creation of a Well in OpenWells® software click here.
In OpenWells a Well is created in the Well Explorer tree.
Create a New Well
To create a ![]() Well, select the
Well, select the ![]() Site level in the Well Explorer tree.
Site level in the Well Explorer tree.
A new Well can be created using the context-sensitive ![]() button in the toolbar or by using the menu path.
button in the toolbar or by using the menu path.
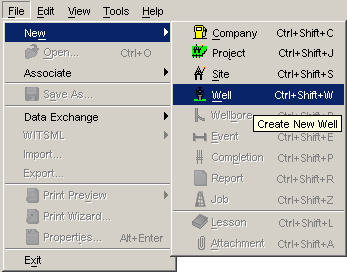
From the File menu select the New command followed by the ![]() Well sub-command.
Well sub-command.
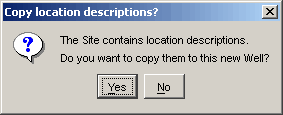
If Location descriptions have been defined in the Site Properties dialog a message appears asking if you would like to copy this information to the Well. Click Yes to copy the information or click No to ignore the information.
The Well Properties dialog appears. This dialog is used to define the Well.
Enter all available information in the tabs of this dialog.
Click the OK button to save changes and close the dialog.
A dialog appears asking if you would like to create a Wellbore. Click Yes to create a new ![]() Wellbore under the Well or click No to close the dialog.
Wellbore under the Well or click No to close the dialog.
A dialog appears asking if you would like to create a Event. Click Yes to create a new ![]() Event under the Well or click No to close the dialog.
Event under the Well or click No to close the dialog.
The new Well now appears in the Well Explorer tree. To view or edit the Well Properties dialog again select the Well and click ![]() Properties button in the toolbar.
Properties button in the toolbar.
Well Properties Dialog
The Well Properties dialog, contains a number of tabs which record information on the Well and define various parameters for the OpenWells application.
General Tab
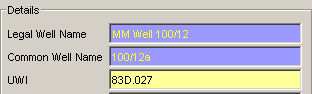
This area identifies the Well. The Legal and Common Well Names and UWI can be used to identify the Well in the Well Explorer tree and must be a unique.
The first time the Legal Well Name is entered, it is automatically copied over to the Common Well Name and UWI fields. Edit these fields if required.
If a Tight Group is defined for the ![]() Site it is automatically assigned to the Well.
Site it is automatically assigned to the Well.
Only users who have membership in the selected tight group will be able to see this well in the Well Explorer tree.
Keep the default or select another Tight Group from the picklist.

Entering a Spud Date initializes the Well. This means that drilling has commenced. This field is often entered after the creation of the Well.
Select the display unit system in which Well data is to be displayed. This is the default display unit system for the Well data set. When a Well or one of its Wellbores is opened, the display unit system will automatically change to the Unit System selected in this picklist, which is displayed in the OpenWells status bar.
Note: Unit Systems are defined in Unit Systems Editor.
![]()
See the General Tab topic for details of the other fields in this tab.
Depth Reference Tab
The Depth Reference Tab is used to define reference datum level elevations entered in the application in relation to the system datum defined at the Project level.
The Project’s system datum is displayed at the top of the Depth Reference tab.
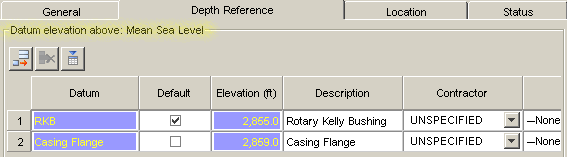
To create a reference datum level click the Add a row button (![]() ). A new row appears in the spreadsheet.
). A new row appears in the spreadsheet.
Enter the Datum name (e.g. RKB).
The Elevation column defines the height above the system datum. This value defines the “depth reference”.
Enter a Description of the datum.
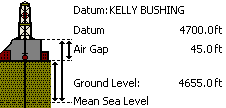
Wells can be defined as Land, Offshore or Subsea.
Land: To define a Land well enter the Ground Elevation. This field defines the distance from the system Datum to ground level.
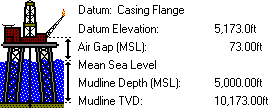
Offshore: To define an Offshore well select the Offshore check box and enter the Water Depth. This field defines the distanced from the System Datum to the mud line.
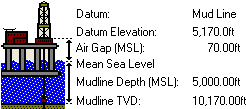
Subsea: To define a Subsea well select both the Offshore and Subsea check boxes and enter the Water Depth.
The diagram in the Summary area illustrates the relationship between the system datum and the reference datum.
|
Land |
Offshore |
Subsea |
|
|
|
|
See the Depth Reference Tab topic for details of the other fields in this tab.
Location Tab
The Location tab defines the Wellhead center location.
The location can be defined using any one of the 4 available options:
Slot,
Offset from Site,
Map,
Geographic.
The Slot option is predefined template created in COMPASS, which automatically populates the other three options.
Note: If a Slot has been defined for the Well in COMPASS, only the Slot name can be edited in OpenWells.
The Offset from Site, Map and Geographic options are entered by the user.
Regardless of the method selected all other values are automatically calculated but are displayed greyed-out.
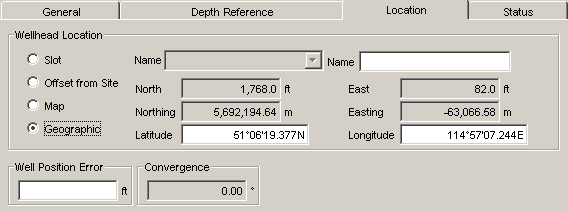
See the Location Tab topic for details of the other fields in this tab.
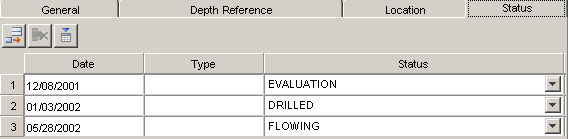
Status Tab
The Status tab records status changes during a Well’s life cycle.
To add a status, click the Add a row button (![]() ).
).
Enter the Start date of the status. The current date can be entered by pressing the F12 function key on you keyboard.
Select the status from the Status picklist.
Use the Tab key on your keyboard or the scroll bar to enter data into the other spreadsheet columns.
See the Status Tab topic for details of the other fields in this tab.
Location Description Tab
The Location Description tab defines a Unique Well Identifier (UWI) using a variety of formats.
At the time the Well was created if you selected Yes to copy Location Descriptions of the Site Properties then this information is automatically populated in this tab.
To add a location description, click the Add a Row button (![]() ).
).
Select the location type from the dialog that appears and click OK.
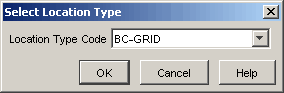
A new row appears in the spreadsheet.
The Details area below contains fields directly related to the Location type selected in the spreadsheet.
Enter location data in this area.
Select the Primary check box for the location description that defines the UWI for the well.
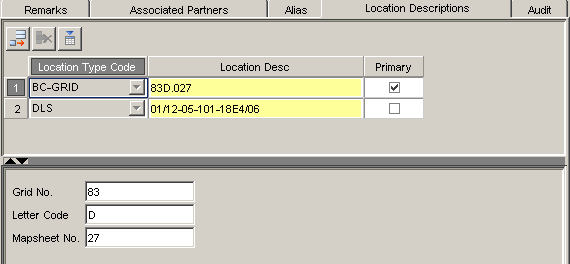
When this check box is selected the UWI appears in the General Tab of the Well Properties.
See the Location Descriptions Tab topic for details of the other fields in this tab.
Audit Tab
Use the Audit tab to tracks modifications to the dialog.

See the Audit Tab topic for details of the other fields in this tab.