Step 2: Configure the Field for Data Transfers
Field Office Data Transfer
The Field system must be configured prior to successfully transferring Reports to the Office database. This topic outline the procedure for configuring the Field system for transfer of data and data requests. .
Notes:
Folder path directories using a network drive letter (e.g., N:\ edmftp) or ftp://Landmark/ edmftp, or http://Landmark/ edmftp paths will not work with the receiver process. Use only local drive letters or UNC paths.
On the Field machine, if Dial-Up Networking is to be used as the connection type, verify that a Windows RAS connection has been configured for this purpose.
(Email method only) The network ID used during the data transfer must have authorization to send and receive emails from the Field's email address.
(FTP method only) The FTP Home Directory on the FTP Server must be configured as "writable". For information on this see Configuring the FTP Server in the Field Office Data Transfer online help.
To configure the Office machine see Step 1: Configure the Office Community Systems for Data Transfers and Requests.
To configure the FTP Server see Configuring the FTP Server in the Field Office Data Transfer online help.
To configure the Field machine for Data Transfers:
Launch the Field Office Data Transfer application.
Select the network connection for the data transfer, using the Tools > Options command. The following options are available:
LAN - Rig site is connected to the Office network.
Dial-Up Networking - If Dial-Up Networking is selected, click the Configure button to select the Dial-Up Networking connection to be used. Enter the User Name, Password, and Domain information for the connection. Activate the Attempt an automatic connection on startup check box to use the RAS connection to automatically login to the network when the Field Office Data Transfer application is launched.
Data Transfers can be implemented using Email or FTP to send the files to the Office system. Both methods are outlined below.
Select FTP for the method of transfer.
Click the Configure button. The FTP Configuration dialog appears.
The following options are available in the Security Defaults area:
User Authentication - If set, this option requires that the Field's user account be verified against the Office EDM™ database. If the Field's user account cannot be verified against the Office EDM Database the data transfer will be canceled.
Tight Group Authentication - If set, only members of the Project, Site, or Well's tight group will be allowed to transfer the data or access data from the receiving end. If the sending user is not a member of a tight group assigned to the Project, Site, or Well data being transferred the entire data transfer will be cancelled.
Encryption - The data transferred can be encrypted to secure contained information during the transfer. The encryption password entered on the Field's machine must be entered in the Encryption Key field and must match the Encryption password entered on the receiving Office system. Important! An encryption password must be exactly eight characters in length.
Enter the following information in the FOT Temporary Files Directory Area.
Working Directory - This field defines the location where the temporary data transfer files are placed by the application on the Field system.
IMPORTANT! The Working Directory folder must exist on the Field machine.
Enter the following information in the FTP Connection Settings Area.
FTP Server - This field defines the name of the FTP Server.
FTP User Name - This field defines the username to access the FTP Server.
FTP Password - This field defines the password to access the FTP Server.
Destination Directory - Enter the directory folder name where the data transfer files are placed on the FTP Server. Enter only the directory name (e.g., Rig65) not the path name. This directory will be created under the User Name folder in the FTP Server's Home Directory. For example, if the FTP User Name ' simon' has a folder on the FTP Server called ' simon', the folder name defined in the Destination Directory field will be created under the ' simon' folder on the FTP Server. Transferred files will be placed in this folder.
Note: If the FTP User Name folder does not exist on the server the Destination Directory folder will be created in the FTP Server's Home Directory.
Click the Test Connection button.
If the Destination Directory defined above does not exist on the FTP Server under the FTP User's directory the following message will appear.

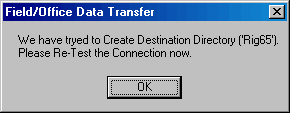
Click Yes to create the folder. The following message appears.

Click OK.
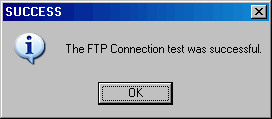
Click the Test Connection button again. The following dialog should appear.

Click OK. If the FTP Error dialog appears again, confirm that the FTP User has Write permission to the FTP Server's Home Directory.
Click OK to save the changes and return to the Transfer Options dialog.
Click OK to return to the main application window.
If the Field machine is going to be used to perform Data Requests, the Data Receiver services must also be configured. For instructions see Step 3: Configure the Field for Data Requests.
Select EMail for the method of transfer.
Click the Configure button. The Email Configuration dialog appears.
The following options are available in the Security Defaults area:
User Authentication - If set, this option requires that the Field's user account be verified against the Office EDM database. If the Field's user account cannot be verified against the Office EDM database the data transfer will be canceled.
Tight Group Authentication - If set, only members of the Project, Site, or Well's tight group will be allowed to transfer the data or access data from the receiving end. If the sending user is not a member of a tight group assigned to the Project, Site, or Well data being transferred the entire data transfer will be cancelled.
Encryption - The data transferred can be encrypted to secure contained information during the transfer. The encryption password entered on the Field's machine must be entered in the Encryption Key field and must match the Encryption password entered on the receiving Office system. Important! An encryption password must be exactly eight characters in length.
Enter the following information in the Email Protocols Area
IMAP Host - The Internet Mail Access Protocol allows receiver to access and manipulate the data transfer sent via email. The IMAP Host is the mail server which receives email messages. Enter the IMAP Host of the Field's email account. An example of an IMAP Host is landmarkexch01.ad.landmark.com.
SMTP Host - The Simple Mail Transfer Protocol is used to transfer the email from the Field to the Office and to send status reports back again. The SMTP Host is used by the mail server to figure out the correct routes to send the email to ensure message reaches its intended recipients. Enter the SMTP Host of the Field's email account. An example of an SMTP Host is mail.landmark.com.
Note: If these values are not known see the Email System Administrator.
Enter the following information in the Email Information Area. This area defines the email addresses and connection information for the Sender's and Receiver's email accounts.
Sender Email Address - this is a dedicated email account set up on the Field machine to transfer data.
Receiver Email Address - this is a dedicated email account set up on the Office machine, which will receive the data.
Network User ID, and Network User Password - these fields define the network email connection information for the Field user's email account. Depending on the Email Server configuration the User ID may be entered in the following format: <DOMAIN>\<Network Username>\<email alias> (e.g., LANDMARK\jsmith\jsmith).
Note: If the User ID and Password are not known see the Email System Administrator.
Caution: If the email addresses entered do not match the email addresses entered on the Receiver (Office) machine the data transfer will not work. Ensure the names match exactly (e.g. capitalization is important).
Enter the following information in the FOT Temporary Files Directory Area.
Working Directory - This field defines the location where the temporary data transfer files are placed by the application on the Field system.
IMPORTANT! The Working Directory folder must exist on the Field machine.
Click OK to save the changes and return to the Transfer Options dialog.
Click OK to return to the main application window.
If the Field machine is going to be performing Data Requests the Data Receiver services must also be configured. For instructions see Step 3: Configure the Field for Data Requests.